Use UniFi Switch 8 POE-150W as media converter with port based VLAN
Use your UniFi Switch 8 POE-150W as media converter to get rid of additional hardware.

I'm using Init7's Fiber7 for quite a while now. For my initial 1 Gbps network setup i bought this media converter: TP-LINK MC220L. I never had an issue with it and it is still working. But i always wanted to use my Unifi Switch 8 POE-150W as media converter since i still have some free ports.
In this blog article, i'll explain on how you can setup the Unifi Switch 8 POE-150W (Ubiquiti US-8-150W) as media converter. The configuration is pretty simple.
Requirements
On the Unifi Switch you need:
- 1 free RJ45 LAN Port
- 1 free SFP Port
The other needed equipment should also be clear:
- Fiber optic cable from the OTO socket
⤷ I use this: Lightwin Fiber optic cable (300cm) - Bidirectional WDM SFP module
⤷ I use this one: TP-LINK TL-SM321B, SFP, Simplex, LX/LC (transceivers) - Firewall / Router with WAN and LAN Ports
⤷ I use the Ubiquiti USG: UniFi Security Gateway
Overview
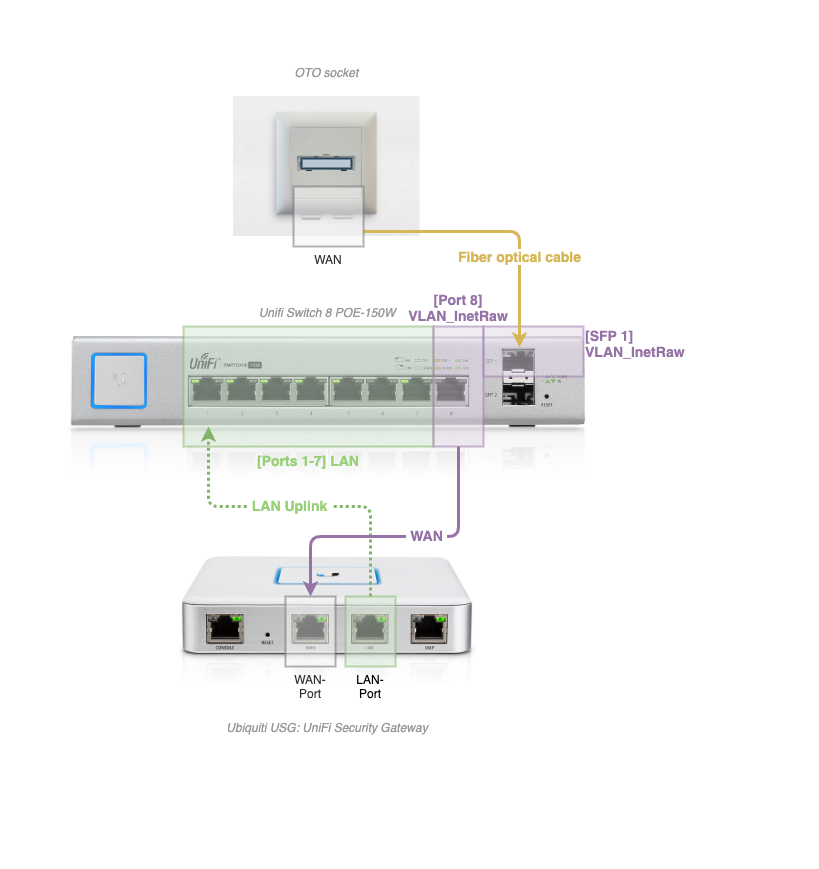
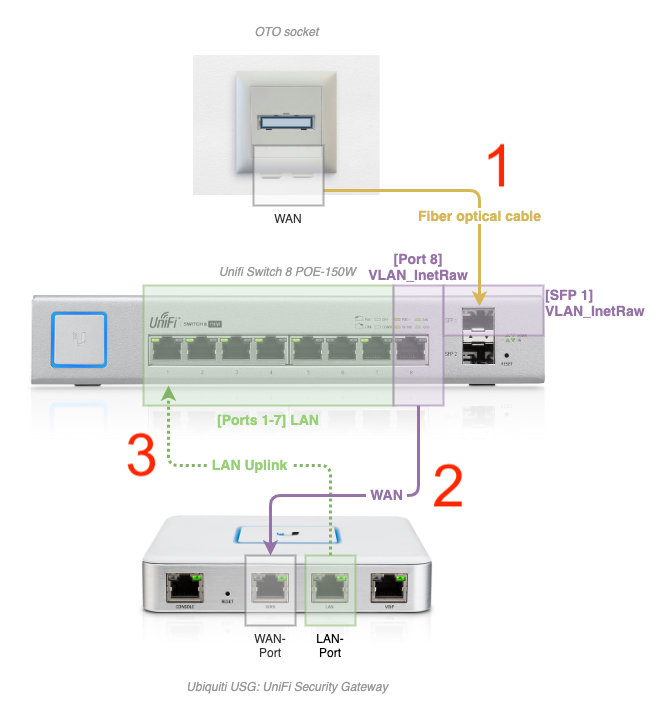
Final configuration in this example setup (with Unifi USG) looks like this:
You need to decide on when you want to plug the new configuration. You could plug in before configuring the network and switch ports, or you can do that afterwards. I did everything after the configuration because i had a running network. Like this, there is only a very short outage when plugging in to the new ports.
Note: This is an example configuration. You can name your networks as you like. You can also change the Unifi Switch Port numbers to whatever Ports you have available. This example should also work if you have different hardware for the Firewall / Router or Unifi Switch with an SFP Port.
Step 1: Create a backup of your configuration
Create a Unifi Controller backup which includes all devices: Go to Settings > Maintenance > Backup and click the Download-Button.
See also: Generating a New Backup
Step 2: Create a new VLAN only network
To create a new VLAN, go to Settings -> Networks -> Local Networks in your Unifi Controller, then click on the Create New Local Network-Button. Choose Create Advanced Network, then VLAN only and finally you can enter a network name and a VLAN ID:

The network name and the VLAN ID can be chosen at will. Just make sure that you don't already use the VLAN ID or network name somewhere else.
Step 3: Configure the Unifi Switch ports
Now we will configure the Unifi Switch ports to use the correct network.
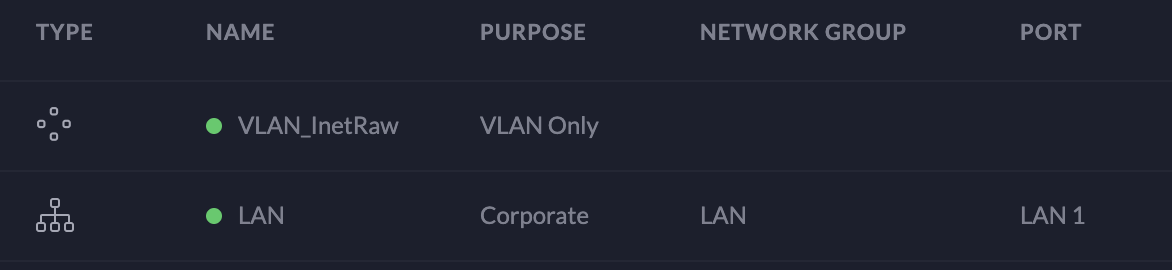
In my case i already have a running corporate network called LAN:

With the newly configured VLAN only network called VLAN_InetRaw, i now have two networks setup:
The port configuration for the Unifi Switch should now be like so:
- Port 1-7:
LAN - Port 8 & SFP 1:
VLAN_InetRaw
Configuring Ports 1-7 with new Switch Port Profile
Change Ports 1-7 to use the Switch Port Profile LAN:
Configuring Port 8 and SFP 1 with new Switch Port Profile
Change Port 8 and SFP 1 to use the Switch Port Profile VLAN_InetRaw:

That's all for the Unifi Controller configuration!
These Port changes are now provisioned to the Switch and should be active immediately after provisioning.
If you didn't already switched the fiber optical and the RJ45 plugs, here is how it should be plugged:
- Fiber optic cable from the
OTO sockettoSFP 1Port on the Unifi Switch using the Bidirectional WDM SFP module - From Port 8 to the USG WAN-Port
- From the USG LAN (LAN 1) to Port 1-7 of the Unifi Switch
All done! You should now have access to the internet again in your network.
If it does not work, check all of the configurations, cables and plugged ports again to make sure there was no mistake. Check also whether the plugs are inserted correctly.
If it still fails and you are sure that the setup/configuration is correct, revert everything you have done and restore the configuration backup from Step 1: Restoring a Backup