AWS EC2 Instanz erstellen mit Terraform


Simple Anleitung zum erstellen einer EC2 Instanz (Ubuntu 16.04) samt "einfachem" Netzwerk mit Terraform. Für die EC2 kommt zusätzlich noch cloud-init zur Initialisierung zum Einsatz.
Schritte:
- Netzwerk & Routing & FW-Regeln erstellen
- Wir erstellen ein VPC mit einem public Subnet und entsprechendem Routing über einen Internet Gateway. Mit Security Gruppen erlauben wir zusätzlich Port 80 und 22 (Egress & Ingress).
- EC2 Instanz erstellen
- Initialisieren während dem ersten starten mit "Cloud-Init".
Cloud-Init führt folgende Schritte durch:- Fügt die Paketquelle für "Ansible" hinzu
- Aktualisiert die vorhandenen Pakete
- Setzt die Zeitzone auf "Europe/Zurich"
- Konfiguriert NTP mit Pool/Server
- Entfernt "snapd"
- Installiert Pakete: python-pip, nginx, ansible, htop
- Erstellt einfache "nginx" Standardseite
- Initialisieren während dem ersten starten mit "Cloud-Init".
AWS Netwerkgrundlagen
Das "einfache" Netzwerk ist doch schon ein wenig komplex um es in Terraform abzubilden. Es besteht aus folgenden "Komponenten":
- VPC (Virtual Private Cloud)
- Subnets (VPC and subnet basics)
- Gateway (VPC Internet Gateways)
- Routing (VPC Route Tables)
- Security (VPC Security)
Einige verschiedene Beispiele von Netzwerk Szenarien findest Du hier:
VPC Scenarios
Die verschiedenen Regionen und Zonen von AWS: Regionen und Zonen
Eingesetzte Terraform Version in dieser Anleitung:
$ terraform version
Terraform v0.11.1
+ provider.aws v1.5.0
Legen wir los
Gehe zu deinem Projektordner und Klone das Projekt terraform-aws-example:
git clone https://bitbucket.org/22phuber/terraform-aws-example.git terraform-aws-example
cd terraform-aws-example
AWS Zugriff und SSH Public Key
AWS Access Key & Secret konfigurieren. Dein Public Key einrichten für SSH Zugriff
mv template.terraform.tfvars terraform.tfvars
# Füge deine Zugangsdaten und den SSH public key hinzu
vim terraform.tfvars
↓
AWS_ACCESS_KEY = "enter-your-aws-access"
AWS_SECRET_KEY = "enter-your-aws-secret"
SSH_PUB_KEY    = "enter-your-ssh-public-key"
Installiere Terraform
Terraform herunterladen/installieren:
Terraform Initialisieren
Terraform kann anhand der Konfigurationsdateien erkennen was alles benötigt wird und dementsprechend die Module/Plugins herunterladen. Mehr dazu terraform init
Initialisiere Terraform mit terraform init:
$ terraform init

Initializing provider plugins...
- Checking for available provider plugins on https://releases.hashicorp.com...
- Downloading plugin for provider "aws" (1.5.0)...

The following providers do not have any version constraints in configuration,
so the latest version was installed.

To prevent automatic upgrades to new major versions that may contain breaking
changes, it is recommended to add version = "..." constraints to the
corresponding provider blocks in configuration, with the constraint strings
suggested below.

* provider.aws: version = "~> 1.5"

Terraform has been successfully initialized!

You may now begin working with Terraform. Try running "terraform plan" to see
any changes that are required for your infrastructure. All Terraform commands
should now work.

If you ever set or change modules or backend configuration for Terraform,
rerun this command to reinitialize your working directory. If you forget, other
commands will detect it and remind you to do so if necessary.
Terraform: main.tf
In der Datei main.tf ist die gesamte Terraform-Konfiguration.
https://bitbucket.org/22phuber/terraform-aws-example/src/master/main.tf
Einige Konfigurationsabschnitte schauen wir uns genauer an:
AWS Region und Availability Zone
In diesen zwei Blöcken wird die AWS Provider Informationen konfiguriert:
# Specify the provider and access details
provider "aws" {
  region = "eu-central-1"
  access_key = "${var.AWS_ACCESS_KEY}"
  secret_key = "${var.AWS_SECRET_KEY}"
}

# var availability_zone
variable "desired_availability_zone" {
  default = "eu-central-1a"
}
Mit region = "eu-central-1" wird die AWS Region angegeben.
Ihr könnt diese auch ändern auf eure gewünschte Region. Jedoch muss dann ebenfalls die Availability Zone (default = "eu-central-1a") entsprechend angepasst werden und das AMI = Amazon Machine Image für die EC2 Instanz.
Die Konfiguration für die EC2 ist ganz weit unten in der main.tf:
  # search ami ids => https://cloud-images.ubuntu.com/locator/ec2/
  ami           = "ami-df8406b0" # ami for you region
TIP: Wie im Kommentar ersichtlich, gibt es eine extra URL für Ubuntu cloud EC2 AMIs um die ID zu finden: https://cloud-images.ubuntu.com/locator/ec2/
SSH Key
Dieser Block erstellt ein "SSH key pair" anhand der SSH_PUB_KEY Variable in der terraform.tfvars Datei.
# create a ssh keypair
resource "aws_key_pair" "pubkey" {
  key_name   = "my-pubkey"
  public_key = "${var.SSH_PUB_KEY}"
}
VPC und Subnet
Beim VPC und Subnet kann die CIDR Maske gewählt werden:
# add vpc
resource "aws_vpc" "vpc_terraform" {
  cidr_block = "10.99.0.0/16"
  enable_dns_support = true
  enable_dns_hostnames = true
  tags = {
    Name = "VPC Terraform"
  }
}

# add subnet (public)
resource "aws_subnet" "subnet_public_terraform" {
  vpc_id = "${aws_vpc.vpc_terraform.id}"
  cidr_block ="10.99.1.0/24"
  map_public_ip_on_launch = "true"
  availability_zone = "${var.desired_availability_zone}"
  tags {
    Name = "Subnet (public) Terraform"
  }
}
VPC: cidr_block = "10.99.0.0/16"
Subnet: cidr_block ="10.99.1.0/24"
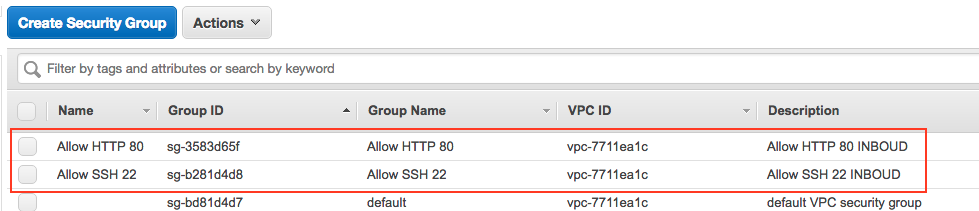
Security Groups
Mit den folgenden zwei Security Gruppen erlauben wir Port 80 & 22 eingehend und ausgehend:
# create inbound sec group for http
resource "aws_security_group" "sec_group_http80_terraform" {
  name = "Allow HTTP 80"
  tags {
        Name = "Allow HTTP 80"
  }
  description = "Allow HTTP 80 INBOUD"
  vpc_id = "${aws_vpc.vpc_terraform.id}"

  ingress {
    from_port = 80
    to_port = 80
    protocol = "TCP"
    cidr_blocks = ["0.0.0.0/0"]
  }
  egress {
    from_port = 0
    to_port = 0
    protocol = "-1"
    cidr_blocks = ["0.0.0.0/0"]
  }
  lifecycle {
    create_before_destroy = true
  }
}

# create inbound sec group for ssh
resource "aws_security_group" "sec_group_ssh22_terraform" {
  name = "Allow SSH 22"
  tags {
        Name = "Allow SSH 22"
  }
  description = "Allow SSH 22 INBOUD"
  vpc_id = "${aws_vpc.vpc_terraform.id}"

  ingress {
    from_port   = "22"
    to_port     = "22"
    protocol    = "TCP"
    cidr_blocks = ["0.0.0.0/0"] # optional: you can change this to your public IP/IP-Range
  }
  egress {
    from_port = 0
    to_port = 0
    protocol = "-1"
    cidr_blocks = ["0.0.0.0/0"]
  }
  lifecycle {
    create_before_destroy = true
  }
}
Optional kann der CIDR Block für die eingehende SSH Verbindung cidr_blocks = ["0.0.0.0/0"] auch auf die öffentliche IP oder IP-Block eures Netzwerkes geändert werden.
EC2 Instanz
Das erstellen der EC2 Instanz:
# create ec2 instance from ami
resource "aws_instance" "ec2_terraform" {
  # search ami ids => https://cloud-images.ubuntu.com/locator/ec2/
  ami           = "ami-df8406b0" # ami for you region
  instance_type = "t2.micro" # you may choose if you are on free tier: "Free tier eligible"
  subnet_id     = "${aws_subnet.subnet_public_terraform.id}"
  key_name      = "${aws_key_pair.pubkey.key_name}"
  associate_public_ip_address = true
  security_groups = ["${aws_security_group.sec_group_http80_terraform.id}","${aws_security_group.sec_group_ssh22_terraform.id}"]
  lifecycle {
    create_before_destroy = true
  }
  tags {
    Name        = "Terraform-Test"
  }
  # using cloud init => https://cloudinit.readthedocs.io/en/latest/
  user_data     = "${file("user-data.yml")}"
}
instance_type = "t2.micro": Definiere der gewünschten Instanz Typ: https://aws.amazon.com/de/ec2/instance-types/
associate_public_ip_address = true: Mit dieser Option wird eine öffentliche IP erstellt.
Mit lifecycle => create_before_destroy Wir zuerst eine neue EC2 erstellt bevor die "alte" gelöscht wird.
user_data = "${file("user-data.yml")}": Hier wird die cloud-init Konfiguration angeben.
Cloud-Init: user-data.yml
Die cloud-init Konfiguration in yaml Syntax.
https://bitbucket.org/22phuber/terraform-aws-example/src/master/user-data.yml
Hinzufügen der Apt Paketquelle (PPA) für Ansible:
apt:
  sources:
    ansible:
      source: "ppa:ansible/ansible"
Apt aktualisieren, dann upgrade und dem Image erlauben neu zu starten falls nötig mit package_reboot_if_required:
package_update: true
package_upgrade: true
package_reboot_if_required: true
Zeitzone setzen:
timezone: Europe/Zurich
NTP konfigurieren:
ntp:
  pools: [0.ch.pool.ntp.org, 1.ch.pool.ntp.org, 2.ch.pool.ntp.org, 3.ch.pool.ntp.org, ntp.myorg.org]
  servers:
    - 130.60.128.3
    - 130.60.64.51
    - 130.60.204.10
Kommandos ausführen mit runcmd. Apt nochmals aktualisieren und snapd deinstallieren:
runcmd:
  - apt update
  - apt purge snapd -y
Folgende Pakete installieren:
packages:
  - python-pip
  - htop
  - nginx
  - ansible
Und schlussendlich nochmals einige Kommandos ausführen:
runcmd:
- pip install --upgrade pip
- apt autoclean -y
- apt autoremove -y
- echo '<!DOCTYPE html><html><head><title>Welcome to Terraform test</title><style>body{width:35em;margin:0 auto;font-family:Tahoma,Verdana,Arial,sans-serif;}</style></head><body><h1>Welcome to Terraform test!</h1><p>Terraform AWS EC2 test...</p><p><a href="https://www.supportblog.ch/">www.supportblog.ch</a><br/></p><p><em>Thank you for trying.</em></p><iframe src="https://giphy.com/embed/vQqeT3AYg8S5O" width="480" height="330" frameBorder="0" class="giphy-embed" allowFullScreen></iframe><p>That was easy!? <a href="https://giphy.com/gifs/gets-smart-question-vQqeT3AYg8S5O">via GIPHY</a></p></p></body></html>' > /var/www/html/index.nginx-debian.html
- systemctl reload nginx.service
Aufräumen, pip aktualisieren, einfache Standard Index-Datei für nginx erstellen und dann nginx reloaden.
Terraform: terraform plan
Mit terraform plan können wir nun sehen was Terraform ausführen würde. Terraform erstellt anhand der schon vorhandenen Ressourcen in der AWS und seiner jetzigen Konfiguration einen Ausführungsplan:

Terraform: terraform apply
Mit terraform apply führen wir die Schritte aus nach einer finalen Bestätigung mit yes:
Die Outputs von den folgenden Zeilen sind am Ende zu sehen:
# availability zone
output "availability_zone-name" {
value = "${var.desired_availability_zone}"
}
# vpc id
output "vpc-id" {
value = "${aws_vpc.vpc_terraform.id}"
}
# subnet id
output "subnet-id" {
value = "${aws_subnet.subnet_public_terraform.id}"
}
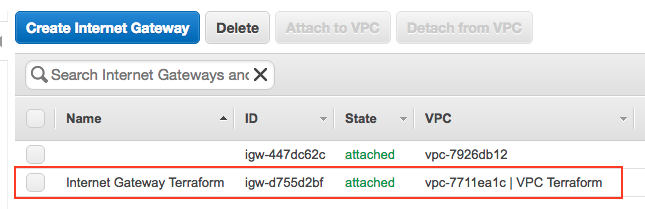
# internet gateway id
output "gw-id" {
value = "${aws_internet_gateway.gw_terraform.id}"
}
Outputs:

availability_zone-name = eu-central-1a
gw-id = igw-d755d2bf
subnet-id = subnet-e74ac58c
vpc-id = vpc-7711ea1c
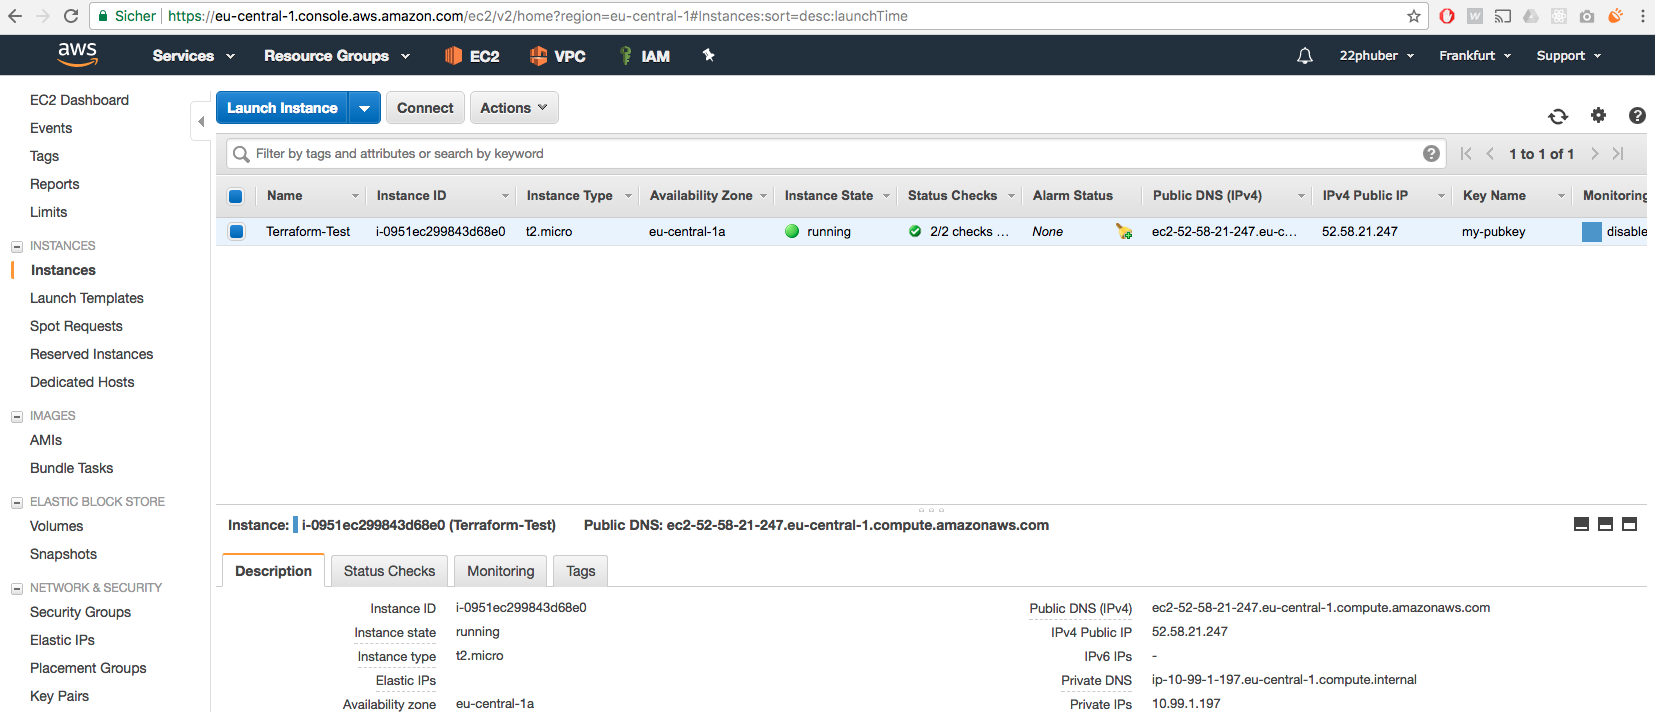
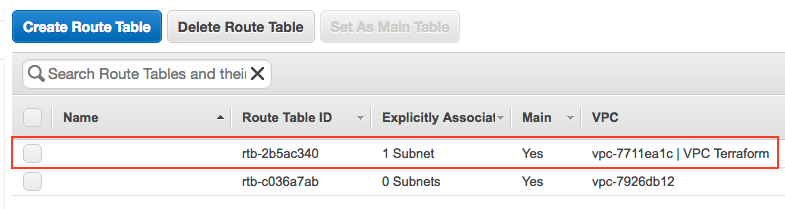
AWS Management Console
Nun schauen wir uns das Terraform Resultat genauer an. In der AWS Management Console unter EC2 -> Instances sehen wir nun die erstellte EC2 Instanz:
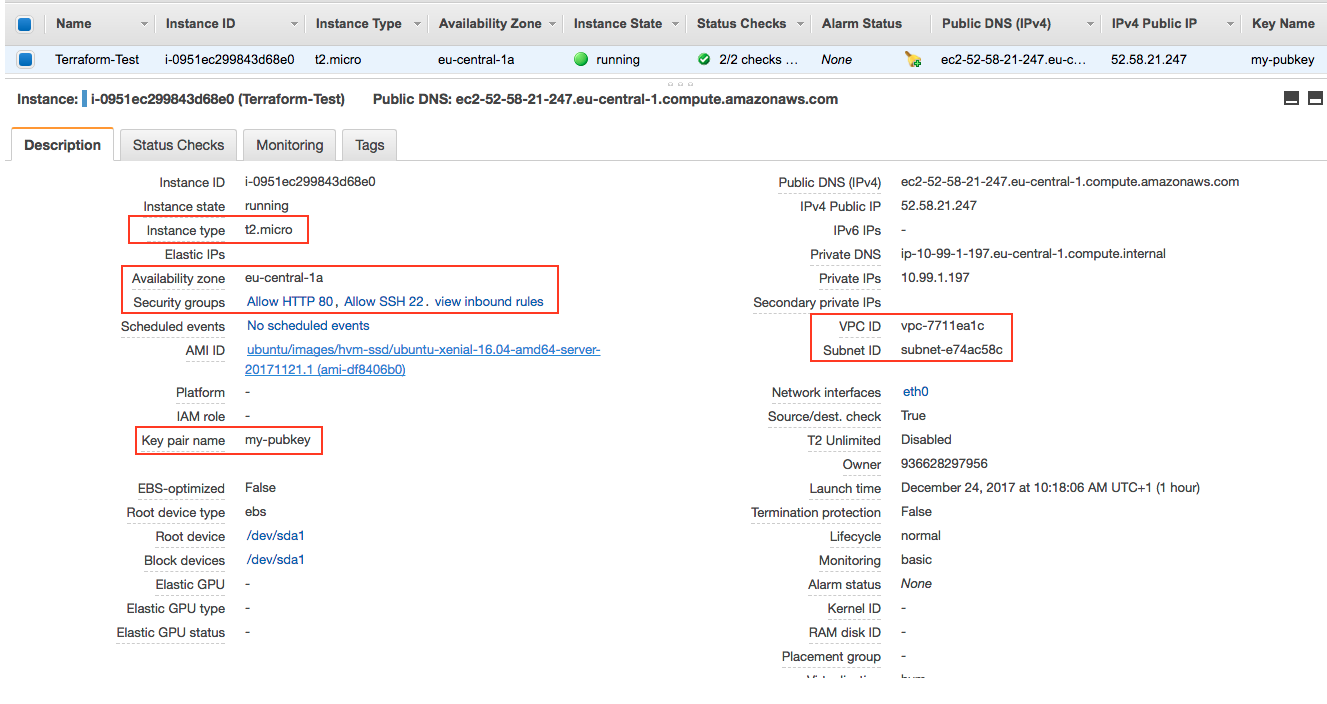
Die erstellte Konfiguration der EC2:


Public DNS URL
Nach 3-5 Minuten sollte auch Cloud-init durchgelaufen sein und wir können den Public DNS Link im Browser aufrufen:


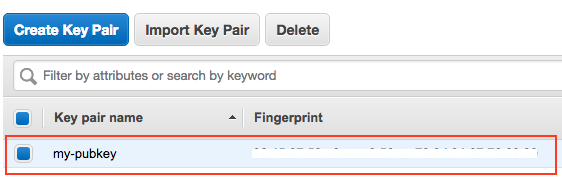
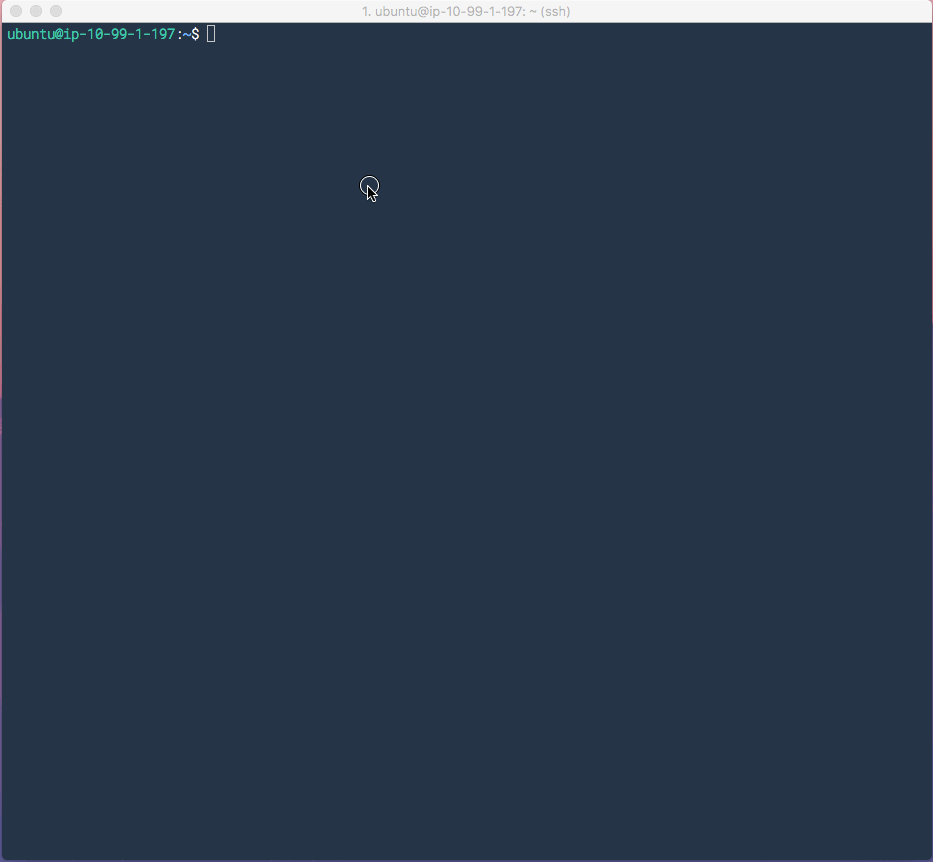
SSH Zugriff mit Public Key
Nun testen wir den Zugriff mit dem hinterlegten public key:

Cloud-init config
Schauen wir uns noch die cloud-init Konfiguration an:
Scheint alles bestens geklappt zu haben.
So, das war es auch schon. Ich hoffe die Konfiguration ist nützlich für jemanden.